Android Data Recovery
Screenshot tool is one of the most frequently used software or widgets that we can't imagine how life will change without them. When we need to remotely share the specific icon or photos on your computer with our friends we need screenshot software to help us out. The excellent one I'd love to share with it is PokIt, the practical and space-saving software for any PC users. Now let's start the tutorial on how to use PokIt to take screenshot on your computer.
Step 1. Download and Launch PokIt
First thing first, there's no doubt that you should download PokIt on your computer first. After launching PokIt, right click the icon.
Step 2. Do the Settings for PokIt
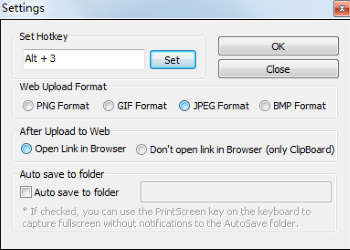
Then, do select "Settings" to customize the hotkey, web upload format, and more before you start. After that, click "OK" on the top-right corner.
Step 3. Start Taking Screenshot on PokIt
Go to the interface which you'd like to take screenshot. Then, type in the hotkey you just set. If you didn't change the hotkey, it will be Alt +3. Tap these two keys on your keyboard and you can start choose the content you want.
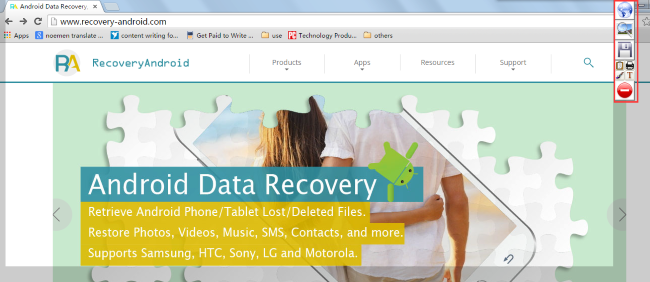
As you can see in the below window, there will occur a small toolbar which allows you to upload to web, search image, save to disk, copy to clipboard, print, paint, add text box and even close. You can choose the one you want.
Note: To cancel the screenshot, you can also simply tap "ESC" on the top-left corner of your keyboard.
That's it. It's very easy to take screenshot, isn't it? With the help of it, you can save the content, photos and something like that as a PNG or JPG format, even if you can't save the original files on your computer. If you think this tutorial useful, please feel free to share it with your friend. And if you want some other useful tips and tricks or the latest infos of the latest mobile phone or computer device, please pay close attention to our blog. We will update it frequently.


